Sunday, 13 October 2024

Following instructions; avoiding assumptions (part 3): booting, using, and installing the live Linux system

TL;DR: this post is about installing Linux on your computer when you want to keep Windows, which most people will, and you only have the one hard disk. If you're installing Linux and you're happy to overwrite everything, then it's practically a three or four click process from the Live environment for most mainstream distros. I've written this as a guide for people I know who can then ask me questions having decided they want to take this (most difficult) route. 

You've downloaded the .iso, and you've written the .iso to a USB drive. Let's revisit our mission statement again:

Linux Mint is a popular Ubuntu-based distribution that we're going to download as an .iso file; we're then going to write the .iso to a USB thumb drive and boot into the live environment. This will allow you to explore Linux without making any changes to your computer. If we're happy with the live environment, we're going to take the next step and install it on our computer. 

Now we have our bootable USB, we're going to boot into the live environment and, in the first instance,  use it as an operating system. Only when we're happy are we going to take the big step of installing it on our system. Booting into the live environment poses no threat to your current setup; but if all of this is completely new to you, you might want to consider booting on an old machine, though I will be exploring ways to make the "install" part of this as safe as possible. 

I'm going to assume that you currently only have Windows on your computer. If you have Linux or Linux and Windows (in other words, you've dual booted before), then this process won't be quite so mysterious to you. It's perfectly possible to set up your system where your offered four or five OSes to boot from at startup if you're so inclined (and some of us are). 

Step one. Insert your USB drive into a USB port and reboot your computer. Almost certainly, nothing will happen -- by nothing I mean you're likely to boot into Windows as usual. This means you have to go into the BIOS and change the boot order, or perhaps you have a boot order menu that can be activated with one of the F keys while your computer starts up. This will be different on different computers, so I can't be certain what you're configuration will be. Below is a screenshot of my computer booting:


Yours, of course, might be different, and very probably is. Whether via the BIOS or the boot order menu or both (when I boot into my BIOS, I'm told to press F8 for the boot menu), you should see your USB drive detected and be able to select it. All being well, you will boot into a live version of Linux Mint. 

If you do not successfully boot into the live environment after you've located the USB drive, it's worth giving it another go, but it's vital you see the live environment working and can use it -- for browsing and creating a file in the office suite, as two examples -- before moving on to the install step. Below is a screenshot of the system booting into a live environment:


And below, having successfully booted (Note: I changed the wallpaper): 


Click on the icon (start menu) in the bottom left-hand corner, and a menu will appear, from where you can browse and launch the applications.


The system is perfectly usable. You can use Firefox to browse the web, LibreOffice to produce documents, you can configure the system to your liking, move the task bar, change the wallpaper, but if you reboot the system all will be lost, though of course you could have saved any files you worked on to an external disk or uploaded them to the cloud. The point is the live environment is a fully functioning operating system you are free to use. You don't have to install it if you don't want to. Explore for a while and decide whether or not you want to install. 

I'm going to assume you do. But here are some questions. 

Do you have just the one disk with Windows on it? If that's the case, you will need to shrink Windows to make room for Linux (this is called partitioning) and install Linux in the newly created space. The installer will do that for you, and you will end up with a setup in which you boot into a Grub menu and choose either Linux or Windows at startup. Linux will be the default. This used to be how it was done, and it can still be done this way today. 

However. Do you have a spare hard disk. The best approach these days -- what with BIOS booting and all -- is to install Linux and its boot-loader on an entirely separate hard disk. This is by far the safest option. A super safe option is to actually disconnect your Windows disk while installing Linux. If not subsequently being able to boot your Windows partition is a nightmare scenario for you, you might want to consider one of the safer options. 

Option 1 (partitioning your existing disk, the riskiest option): 

There is, as you can imagine, more than one way of doing this. This is how I would do it. In the live enviornment, start the program GParted (this is a partitioning program). It will look something like this... ... 


... though if all you have is the Windows installation that came with your computer, you will probably see three or four partitions, all Windows related and maybe one to do with the manufacturer of the computer, who also want a lookin in your life.  The point is you have to shrink the biggest partition (which will be your main Windows partition) to make room for Linux. To do this, right-click and choose Resize/Move and then drag the partition in, thus:


Note: if your Windows partition is quite full you will not be able to shrink it very much, and you might be better with one of the alternative approaches. Now click on Resize/Move and your partition will look like this: 


Apply the changes, and GParted will shrink your partition and create your free space. This may take some time. Quite a lot of time, indeed.  In the free space, you will be creating a partition, on which you will install Linux. 

Note: If all this seems like rather a daunting faff and is putting you off, then good. Far better that you're put off at this stage than rue the day you ever started with it when you can't boot Windows... because then you'll unfairly blame Linux. 

Once you've shrunk your partition, it's a good idea to come out of the live Linux environment and reboot your computer to check you can still boot into Windows. If you boot into Windows, you can continue; if not, you'll be doing a lot searching on your search engine of choice to clear up the mess and recover what you had before. 

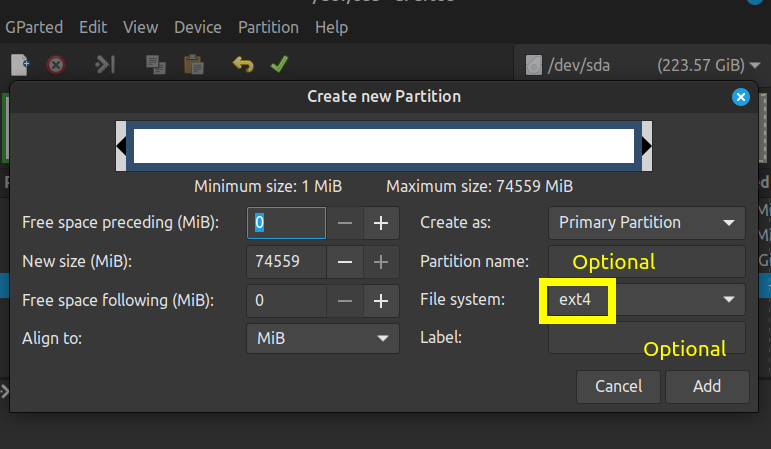
Assuming you successfully booted into Windows, you still have a lot of treacherous terrain to navigate. Insert your USB key and boot back into the Linux live environment. Once there, reopen GParted and create a partition in the free space. I usually go for ext4:


GParted gives you lots of opportunities to back out (helpful when doing screenshots like this), so check your work before applying. With this done, close GParted and start the installation process. To do that, you can double-click on the icon on the desktop.


And this will open the installer: 


Choose your language and click Continue -- you will be taken to the next screen, where you should select your keyboard. Do so, and click Continue.


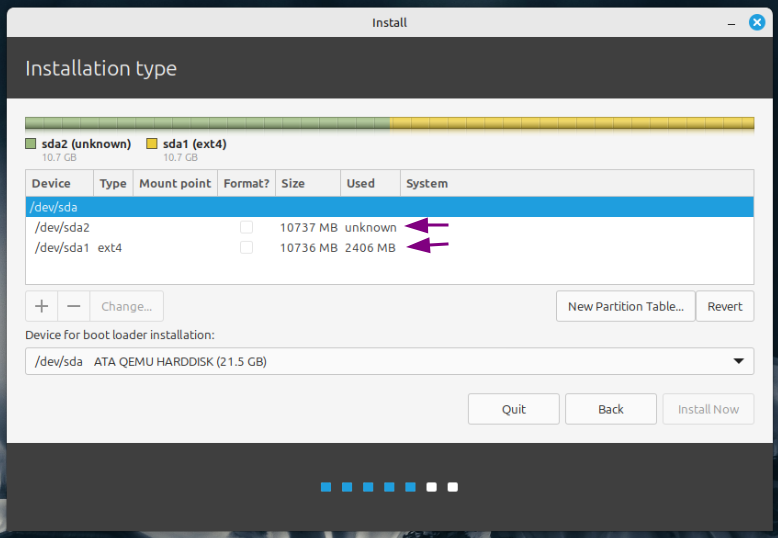
The next screen will ask you if you want to install multimedia codecs. You might as well do so, so tick the box and click Continue. You will be taken to the Installation Type page. This is the tricky bit. You need to select Something Else and then click Continue. 


This is where you have to choose the correct partition and it's vital you get this right. Otherwise you could damage/overwrite your Windows partition. When you click on it, you will have to choose a file system and a mount point. See below:


Click OK and you will get a warning about writing the changes to disk.


If you're comfortable, click Continue. The next screen will ask you where you want to install the boot loader. Since you only have the one disk and you already have an EFI partition, you should click Install Now and the installation will begin. 

If you have never installed an operating system, this will seem very daunting. This is how it used to be done before spare hard disks and BIOS booting, and a lot of lessons were definitely learned the hard way. Nowadays, you would want to leave Windows alone and install on a spare hard disk, ensuring that you also choose to install the boot-loader to that hard disk, too, and don't mistakenly install it to the one your Windows installation is on. This can happen because that's where the installer is likely to find the EFI boot partition. Christopher Barnatt of Explaining Computers even recommends temporarily disconnecting the Windows disk, so there is no risk of making a mistake. 

Monday, 30 September 2024

ShortWave


Love this application, available on Linux. I did check, but it does seem to be exclusive to Linux.

I came across it fortuitously while looking for radio-related applications in my software manager. There are literally 1000s of stations available for your listening pleasure, entirely justifying the excellent appellation.  

As a child, I whiled away many a happy hour oh so carefully turning a dial on an analogue short wave radio to bring in distant stations. And who can forget the mystery of the numbers stations, and the feeling that if you listened long enough the mystery would be revealed.

On a practical note, the BBC has decided you can't listen to its stations online unless you log in, and you don't with this (need to log in, that is). Just search for the station and click on the one you want to listen to. 


You can also choose to create library of stations you want. Here, I'm going to add BBC Radio 3 to my library. 


And, below, my limited library: 


Saturday, 14 September 2024

JMeter Refresher

Again, as with my previous post, it's best to think of this as my course notes. These are meant for me to revisit and understand. I believe it's important to make your learning as accessible to you as possible. Often the way something's explained can be a barrier to your understanding, making it (usually unintentionally) sound more complicated than it actually is. Unfortunately, this puts a lot of people off learning, which is a shame. 

Firstly, I want to record the commands for reports. Note: I'm on a Linux machine. 

If you have an existing results file: sh jmeter -g somefile3.csv -o report-output/mytestreports1 -- this is really easy way to make pretty HTML reports out of existing results files. 


This is how to run the whole kit and kaboodle from the command line. You will need to have created the test in JMeter. 

sh jmeter -n -t "location of jmx test file" -l "location of result file" -e -o "location of reports folder"

And below an actual example: 

sh jmeter -n -t "TrainingHTTPTest.jmx" -l somefile9.csv -e -o "testreporting" 

It's worth noting that, apart from the test file (the one with the jmx extension), the other files, if they don't exist will be created. So you could do it again, thus:

sh jmeter -n -t "TrainingHTTPTest.jmx" -l resultfile12.csv -e -o "testreporting1"

For this simple test, the result file looks like this:


And a report, like the one above, will be created in a folder called testreporting1.

Apparently, when you're running a real-world performance test, you shouldn't be doing it from the GUI with lots of listeners, since this produces overhead. I knew this, and I know it can be important to ring every millisecond out of a performance test. 

So now to JMeter, which is where you create your case.  


You will need the following: 
  • thread group (think users: this simulates the amount of users)

  • a sampler to your thread group (sampler: think the request you want to make, the thing you want to do)

  • a listener (you need at least one of these to have any feedback. There are quite a few to choose from depending on the format you're after). Below is a listerner showing two runs, one that failed and one that passed:

You can use the following:
  • assertions (for example, the right code is returned, or a certain word appears on a page)
  • config element (these run before the sampler and set up initial conditions -- usually for the whole test plan (I think). 
  • pre-processors (things you want to have considered before the sampler runs)
  • post-processors (essentially doing something with the response)

Order of execution of JMeter elements:
  • Configuration elements
  • Pre-processors
  • Timers
  • Samplers
  • Post-processors
  • Assertions
  • Listeners

I went through Raghav Pal's JMeter Masterclass as a refresher course, which can be found here: 


It was a good refresher course, and reminded me that I'd probably made a six course dinner of some things first time round, by which I mean I over-thought and over-complicated them. I must have been in a bad mood last time I installed the Plugins Manager because I remember it as a bit of a faff. It's actually straightforwardly downloading a jar file and putting in a specific folder (learning's all about being in the right mood):


Restart your JMeter and you'll see it under the Options menu, thus:


Performance testing is an important non-functional aspect of testing. Increasingly, customers for software are interested in questions like: How will this behave under load? How many users can I have use a single instance at one time? And more granular questions, such as how long does each process take, or how long does your web application take to move from one process to the other. Can it do parallel processing, etc? JMeter is a free open source tool to answer these question. It's also something of an industry standard. 

I ignored the part of the course that referred to BlazeMeter, preferring to use the Test Script Recorder in JMeter instead. 

The next part of the course covers using JMeter for API testing, which I'll cover in another post. 

Sunday, 8 September 2024

Curling up

I spent Sunday morning (and some of the evening) with Curl and a tutorial. These are simply my course notes.

Curl is a bash/command line application that lets you do multiple different things. I use Linux, so Curl comes as standard. I believe it also comes as standard on a Mac. It used to be a bit of a faff on Windows, but now it comes as standard on W10 and 11. 

To download a web page, do this:

curl -L https://www.bbc.co.uk/sport/rugby-union > beebrugbyunionpage.html

What the above will do is download the source code of the rugby union web page into a file called beebrugbyunionpage.html, which you can then open in your browser. The response in the command line will look like this: 


If you then find your file in your file manager and open it, you will see the web page, thus (note the "URL"):


For the sake of understanding, let's get rid of this bit: "> beebrugbyunionpage.html". So, we're now running: 

curl -L https://www.bbc.co.uk/sport/rugby-union

The above command will return all the source code to your command prompt, thus:


And, as you can see from the position of the scroll bar, it goes on a bit. The point is, though, if you copied all of it and saved it in a file with an .html extension, you would have exactly the same file as the one created by "> beebrugbyunionpage.html". The -L switch tells Curl to follow redirects, which are very common. 
If you wanted to get only the headers from the same page, you would do the following: 

curl --head https://www.bbc.co.uk/sport/rugby-union

Which would return something like this:


Just for the sake of it, I tried this:

curl --head https://www.bbc.co.uk/sport/rugby-union > headers.html

When you open that in a browser, it looks like this:


Note: curl -I and the URL will also bring back only the headers. As far as I can gather, curl -I and curl --head do exactly the same thing. 

I had some chat on Mastodon while I was doing this and someone sent me this: 

curl parrot.live -- which will give you a boogying ASCII parrot.

And this:

curl http://wttr.in/Plymouth -- which will give you the weather in the named town. It looks like this in the command line:


And this:

curl qrenco.de/example.eu  -- will create a QR code for the stated link. I'm a bit suspicious of QR codes and don't have a phone that can read them. 

To get details of the client-server interaction, do the following: 

curl -v https://www.bbc.co.uk/sport/rugby-union -- which will return a lot of detail.

curl --trace file.txt  https://www.bbc.co.uk/sport/rugby-union -- which will produce a file called file.txt with a lot of detail and looks something like this (though it goes on for a bit):


Don't know why the below isn't exactly the same, but it isn't:

curl --trace https://www.bbc.co.uk/sport/rugby-union > file2.txt -- produces the following error: "curl: (2) no URL specified"

To send headers in a request, do the following:

curl -H "Accept:SomeHeader/JSON" https://reqres.in/api/users/2 

Apparently, the following is what's expected, though I'm not sure why: 


And now for a POST request:

curl https://reqres.in/api/users --data "name=morpheus&job=leader" -- this will return the following:


It's somewhat different, however, if you want to use the entire JSON, which looks like this:

I have to get this in a single line, so:  {"name": "morpheus", "job": "leader"}

So your curl should look like the following:

curl -X POST -H "Accept:application/json" https://reqres.in/api/users -d '{"name": "morpheus", "job": "leader"}'

And this is what you're after by way of response:


And similarly a PUT request (with -i added to get the headers): 

curl -i -X PUT https://reqres.in/api/users/2 -d '{"name": "morpheus", "job": "accountant"}'  -- returns the following:


And, finally, before I curl up into a ball, a DELETE request: 

curl -i -X DELETE https://reqres.in/api/users/2 -- and you should get the following response (204 means it's been deleted):


Apparently, there's a lot more you can do with Curl, but that's for another day. But I might end this post by doing the following after I've posted it:

curl https://techstuffandnonsense1.blogspot.com/2024/09/ > curling-up.html

And now if you go to your file manager and locate curling-up.html and open it, you will see the following: 


Time to curl up with a nice cup of tea.

Friday, 6 September 2024

Following instructions; avoiding assumptions (part 2): writing the ISO to a USB drive

The Linux Mint .iso image has been downloaded to your computer and is probably in your Downloads folder on your hard disk: 

linuxmint-22-cinnamon-64bit.iso

We now need to write it to our USB drive. A reminder of our mission statement:

Linux Mint is a popular Ubuntu-based distribution that we're going to download as an .iso file; we're then going to write the .iso to a USB thumb drive and boot into the live environment. This will allow you to explore Linux without making any changes to your computer. If we're happy with the live environment, we're going to take the next step and install it on our computer. 

We've done the first bit. To write the image to our USB drive we will need a tool like Rufus (on Windows) or Balena Etcher (available for Windows, Mac, and Linux). I'm going with Etcher, but other tools are available. Etcher is free for individual use and can be downloaded from here:

https://etcher.balena.io/

Scroll down and you will see the following: 


Choose "Download" next to the one that fits your operating system. With Etcher installed, open it. It will look like the following:


Choose to "Flash from file". This will open your file manager. Navigate to the .iso and select it. File will be selected, and you will move on to the next stage. 


Click on "Select target". A select target box will open with a list of available drives. This is what it looks like on Linux. Here it's sensibly showing only the USB I've plugged in, and NOT the hard disks in my computer. 


However, it could display other disks. The point is you need to be sure of your target BECAUSE everything on the target will be overwritten, and that would make for a very bad day if you get it wrong. So plug in your USB drive, identify it, and choose that as the target when running Etcher.

Once the file and target have been selected, simply click Flash and the process will begin. Be patient and wait for Etcher to tell you the process has completed. 

Close everything down, remove the USB thumb drive, and back away from the computer. Nothing has changed except that you now have an operating system on the USB drive that can be booted, used, and ultimately installed on any number of computers. For free. Legally. 

I wondered if I should end this by booting triumphantly into the live environment, but decided it would be a better fit for the start of "(part 3)". In "(part 3)", we'll be booting to the USB drive, using the system for a while without making changes to our computer, and ultimately then taking the big step of actually installing the system on to our computer. 

Monday, 2 September 2024

Apache JMeter

I once had an acquaintance -- a moved-on colleague -- who worked exclusively with JMeter, or so he claimed. His job title was Performance Tester, and I was led to understand that JMeter was all about performance testing, load testing, stress testing.  I remember being somewhat surprised because at that point I had been naively oblivious to the specialist trends in IT. He had mastered one piece of software and was making a good living at it. I asked him if it was hard, and he said, "No, I just push a button, wait for the run to end, produce the report, and repeat with a different number of users. Sometimes I change the environment it's pointing at."

I asked if it was hard to set up, and he replied that he hadn't set it up. The setup had been done before he arrived. That occasionally something went wrong and he had to work out what it was and fix it, which could be fiddly and tiresome. These bumps in the road apart, he liked his job and had it down pat. 

Other than my above former colleague, I've never met anyone who likes JMeter. There are tutorials explaining how straightforward it is, how easy to master it is, how widely used it is, etc, lifting your heart and soul to the sure and certain knowledge that you, too, can become a performance guru. And then you point it at the software that is your bread and butter and it's glitch after glitch, error after error, frustration after frustration. I don't know anyone who thinks it's intuitive, Oh, and I remember the fun we had setting up the Firefox proxy for JMeter, which promised to make everything plain sailing. Except it didn't.

Perhaps you think this is just me. Sour grapes on the part of someone who couldn't get to grips with it. It truly isn't. I'm someone more than ready to blame my lack of understanding ahead of blaming the tool. No, I've discussed JMeter with many testers who have used it for its intended purpose and they've come away frustrated... and relieved when they get a break from it. 

Lest this all seem like protracted gripe, it's actually a prelude to me spending some days doing Raghav Pal's JMeter Masterclass, which can be found here: 

https://www.youtube.com/watch?v=SoW2pBak1_Q

I'm currently enjoying learning Katalon, but it's good to break it up a bit. Who knows? I may chance upon a tool that really suits me. 

Sunday, 1 September 2024

Katalon Testing Suite

I've always been attracted to low-code, no-code (preferably) automation test suites, probably because I never really got on with coding. Oh, I've dabbled over the years. I've written "Hello World" in quite a few languages, and actually made progress with Python -- in that I completed all the exercises in the course I was following along with. However, in the hierarchy of testing, automation trumps manual. I have known many people leave testing -- or decide against going into it -- because coding seemed the only way forward, and they weren't temperamentally suited to coding. 

There are quite a few low-code, no-code suites, on the market, and they've promised a lot of over the years without ever fully being able to deliver in a world of business bespoke software. I asked Copilot to give me a top ten list of low-code, no-code automation test suites and it returned the following: 

To be frank, I've heard of the top two on that list and Ranorex at No 6. And I was surprised that TestComplete (from SmartBear) wasn't on the list, perhaps because I've seen a lot of marketing for it. 

Anyway, to our Katalon tale. I've had a few cursory looks at Katalon over the years, and liked the fact it had a Linux client. I have to say that it now seems to have reached a surprising (to me anyway) level of maturity. As an aside, I also had an interviewee who sang its praises untroubled by the fact we weren't using it. I sincerely hope she's working in automation using Katalon and is still enthusiastically advocating for it. 

I downloaded the latest free version to follow along with Raghav Pal's Katalon masterclass, which can be found here: 

https://www.youtube.com/watch?v=lcUgrciUCPg

And very good it is, too. The suite and the masterclass. He does lots of training stuff, and if you have the time to follow along and actually do the training as opposed to just watching the video, you will learn a very great deal. And so there I was with Katalon and Raghav following along assiduously, when I hit this error (or limitation): 

I understand. I truly do. This is an application intended for use in businesses, and they don't want to give everything away for free, which is perfectly reasonable. I was just a mite miffed because I was caught up in the flow of the training and it was a bump in the road. 

I now know how to do the following in Katalon: create test cases using three different methods; create a test suite and add test cases to it; create a test collection and add test suites to it. And, of course, I cheerfully ran the tests and watched them complete. I looked at the reporting, which is impressive (businesses love reporting) and I looked at scripting which Raghav made it easy to follow along with. Despite this, I know there is much, much more to this suite than the little I've learned. All I've learned is confined to web applications, which are increasingly common these days. But Katalon also does mobile applications and, I believe, desktop applications. I used to test desktop applications exclusively, but that was before the world changed, and I have no experience testing mobile applications beyond browser simulations of various mobile phones. 

Past real-world problems

Imagine you have a piece of software in which you have to create a list of items, but the snag is that all the items have to have unique names. So you record yourself adding the first item. You go to the URL, you enter the login name and password, you take the steps to add the item, and then you close the browser and save the test. When you run the test, it will fail because the name has already been added and the name has to be unique. I know a coder using the Selenium webdriver (and coding in C#) who solves this problem by simply adding the date and time to the item, thereby making them unique. I'm sure it's not too difficult, but I don't yet know how to do this in Katalon. 

I'm going to continue learning with this suite, as far as the free version will allow, and I will post my progress here. 

Opportunities

Job roles are becoming increasingly specialist, including testing job roles. The day of the charming generalist belongs to yester-year. We used to work in IT, doing a bit of everything as our skills and inclinations took us. Installing software, fixing computers, helping someone having a problem with their hardware, creating and cloning virtual machines, a batch command here, a script there, a select statement here, a manual test there. Now all these things have their particular lanes and boxes, and the rest of it -- such as my enjoyment of Linux on the desktop -- is in the hobbyist arena. 

Employers now want and advertise for a very specific set of skills and tools. I saw one job advert that said "Knowledge of Appium essential". Essential. This was in a long list of other desired skills. Basically, though, don't bother applying if you don't know Appium. I looked it up (it's a tool for testing mobile apps on Android and IOS), but I didn't apply. 

On the plus side, mastery of a particular tool, such as Katalon, would pretty much guarantee you a decent income. And there are people who invest a lot of time trying to divine the next big thing in their arena. In testing, I've heard Playwright and Cypress mentioned. I believe Raghav has a course on both. 

Sunday, 25 August 2024

Following instructions; avoiding assumptions (part 1): downloading the ISO

For the sake of this exercise, I'm going to ask you to do something simple. In this particular case, the downloading of an .iso of the latest Linux Mint to your computer's hard disk.  

There are quite a few assumptions here: that you know what's meant by download; that you know what Linux MInt is and that you know what an .iso image is. 

Often, it helps to have a statement of what we want to achieve and why we're doing it. So...

Linux Mint is a popular Ubuntu-based distribution that we're going to download as an .iso file; we're then going to write the .iso to a USB thumb drive and boot into the live environment. This will allow you to explore Linux without making any changes to your computer. If we're happy with the live environment, we're going to take the next step and install it on our computer. 

Well, okay, you're reading my channel, so I'm entitled to a few assumptions. For example, you know how to open a browser and navigate the world wide web. If given an URL, I'm assuming you'll be able to get there. So please go here:

https://linuxmint.com/  -- you will be taken to the Linux Mint home page. 


The Download button is right there on the front page, so click on it. You might expect the download to start here, but it doesn't because there are choices to make, always a complicating factor. When you click on the Download button, you're taken here: https://linuxmint.com/download.php ... 


... where you have to decide what version of Linux Mint you want to download. We're going to download the flagship Cinnamon edition. 


Click the Download button. Again, the download doesn't start. You have to make more decisions and more choices. We're on a page where we have to choose a mirror (download location) from a list. Most will work, but there's no point downloading from a UK download mirror if you're in Australia. Also, there's this scary message, which most of us ignore, including almost every tutorial on downloading and installing Linux Mint (but it's about checking you have a genuine .iso): 


Scroll through the list of mirrors until you find one that takes your fancy. I'm in the UK, but there's nothing to stop me going German or Danish (adding a cup of coffee as it downloads).


Click on the link and the download will either start or your file manager will open inviting you to save it somewhere. The file name will look like this:


If the latter, navigate to where you want to save the file and click Save. The download will begin and all you have to do is wait. 

After all of the above -- avoiding assumptions isn't easy -- all we've done is download the file. We haven't done anything with it. The more complicated bit is still to come. 

I think I'll add "(part 1)" to the title, and pick it up in "(part 2)"

Following instructions; avoiding assumptions (part 3): booting, using, and installing the live Linux system

TL;DR:  this post is about installing Linux on your computer when you want to keep Windows, which most people will, and you only have the on...